Do It Yourself Monthly Auto Maintenance
The days of the full-service gas station are gone, and modern
cars can go 30,000 miles or more without a tune-up. So it's up to
YOU to check the little things before they become big, expensive
problems by checking under the hood of your car on a regular basis.
Following these simple monthly checks will alert you to potential
problems that can be dealt with before you get stranded or end up
paying for expensive auto repairs.
- Check your car's Fluids
and change it if required and fix the container if the fluid is
leaking
- Check your car's or
4x4's hoses
- Check your Car's or 4x4's belts
- Check your car's and 4x4's engine for leaks
- Other Monthly Checks to Perform on your car
- Your Shopping List for Ongoing Auto Maintenance
First a word of caution on fluids - particularly for import cars.
Car manufacturer's are required to specify in their owner's manuals
all the fluids to be used in your car and the manufacturer's OE
specifications for each. Make sure to check here first - BEFORE
adding any fluids to your car.
It is also required that OE oils and coolants must be mixable
with "off the shelf" products to allow for emergency service. It may
not be the best thing for your engine long-term, but you can add
plain old 30W oil to $5 a quart synthetics and the same goes for
coolants and water.
On the other hand, however, are the hydraulic oils (i.e., power
steering, brake fluid, transmission fluid, differential/axle, etc.).
These must be at certain specifications for viscosity and liquid
type (petroleum vs. mineral vs. synthetic). Hence, it's critical
that you know what products to be adding to your car according to
the specifications given in your owner's manual.
Check the Oil
Check
the oil when the engine is warm. Oil expands when it's hot and
contracts when it's cold; different temperatures will give you
different readings.
Here are the steps to follow to check your car's oil:
- Park the car on a level surface.
- Turn off the engine. It's best to wait at least 10 minutes to
give the oil a chance to drain down into the crankcase. Otherwise,
you might think you're as much as a quart low when you're not.
- Open your hood.
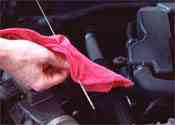
- Find the dipstick - a long piece of metal sticking out of the
engine usually located near the spark plugs with a loop at one end .
Many dipsticks now have a "T" handle or are incorporated into the
fill cap. If you don't find the loop, look for these.
- Pull on the loop and draw the dipstick all the way out.
- Wipe the oil off the dipstick with a paper towel or shop rag.
- Replace the clean dipstick, making sure to push it all the way
in; then pull it back out and hold it horizontally in front of you.
- Look at the pointed end of the dipstick. If the oil on the
dipstick is below the line marked "full", add a small amount of oil
(less than a quarter of a quart) with a funnel. Many dipsticks
simply have two lines with a cross hatch design in between. The oil
level should be halfway between these two lines.
- Add oil by unscrewing the oil filler cap, which is about 3
inches in diameter and is located on the very best of the engine.
- Check the oil level with the dipstick after adding oil. Add
more if necessary. It's easy to add more oil but difficult to remove
oil if you add too much so add slowly and continue rechecking.
- Put the oil filler cap back on and secure it tightly.
It's best to always keep two quarts of oil in your car. Your
owner's manual will tell you what type of motor oil your engine
requires and this may vary on the season/weather. If you're in a
pinch or you only need to add a little, it's okay to mix types - for
example, 10W-40 with 10W-30.
The oil lubricating system is a closed system. This means that
the oil does not get "used up" or go anywhere. If it's consistently
low, there may be an oil leak. Leaks always get worse, and losing
all the engine oil will require expensive repairs and/or replacing
the engine. Make sure to further investigate (on your own or with
the help of a qualified mechanic) if your car seems to have an oil
leak.
You may want to read
Engine
Knock? Low Oil Pressure? Engine How To Diagnose Needed Repairs
for further information on this topic.
You may also want to check out
The Motor Oil Bible: Exposing The Myth of the 3000 Mile Oil Change &
More! for an easy-to-understand, comprehensive and informative
book on motor oil.
Check the Brake Fluid
Check
the brake fluid when you check all the other fluids. It's easy to do
and only takes a minute.
Here are the steps to follow to check your car's brake fluid:
- Find the brake master cylinder. This is usually located under
the hood on the driver's side of the car, toward the back of the
engine compartment. Imagine where your brake pedal would end up if
it went all the way through to the engine. The brake master cylinder
is a small (about 6 by 2 inches), rectangular piece of metal with a
plastic reservoir and a rubber cap on top, with small metal tubes
leading from it.
- Check your owner's manual if you aren't sure that you've found
the master cylinder. The rubber cap will usually read "Use only DOT
3 or 4 brake fluid from a sealed container."
- Note that on most newer-model cars the reservoir is
translucent and you can see the fluid level without removing the
cap. There will be a "Full" line - the brake fluid should be at this
line.
- In older cars (pre-1980), the brake master cylinder reservoir
may be made entirely of metal so you must take the best off to check
the fluid level. The best is held on by a metal clamp - use a
screwdriver to pop off the clamp and lift the lid.
- Add brake fluid to the "Full" line. If the reservoir has two
parts, fill both halves. Use the correct brake fluid for your car.
Check the rubber cap and your owner's manual to find out what grade
of brake fluid your car requires. Most cars use DOT (Department of
Transportation) 3 or 4.
Brake fluid is very toxic. Keep it away from hands and eyes and
avoid spilling it on the ground. Dispose of empty containers
carefully and be especially careful not to spill brake fluid on your
car's paint. Always wash your hands well after handling brake fluid.
If the brake master cylinder is empty, the brake pedal will go to
the floor. If this is the case, you will have to bleed the brakes in
addition to adding fluid. It's probably best to see your mechanic,
who will be able to flush and refill the braking system. Never drive
a car that has run out of brake fluid until bleeding the brakes!
You may want to read
Brake Repairs
Needed? Don't Take Chances with Your Brakes - Repair Them Now
for further information on this topic.
Check your Radiator
fluid or Coolant
Radiator
fluid, or coolant, is the most important part of your car's cooling
system, which protects your engine from overheating. Low coolant can
lead to a breakdown and expensive repairs.
Here are the steps to follow to add coolant to a newer-model car
(1970 and after):
- Note that only much older models of cars (pre-1970s) require
you to add coolant directly to the radiator. Newer vehicles feature
a reservoir (expansion tank) that you can access anytime. Beware:
Some German and Swedish cars (and others) have a reservoir that's
under pressure (pressure cap on the tank vs. a flip-off type plastic
top) and these should not be opened when the engine is hot. If
you're driving an older model car, see the steps below for older
models.
- Look for the plastic reservoir tank, which should at least be
holding some residue of coolant (normally green, although there are
also red versions available on the market). It's often labeled, is
near the radiator and has a hose leading to the radiator. The hose
to the radiator is the tip off that you aren't pouring coolant into
your windshield wiper reservoir.
- Unscrew the cap and add coolant to the "Full" line. Coolant is
a 50-50 mixture of purified (not tap and not distilled) water and
antifreeze/coolant. Do not add straight water if the reservoir is
completely empty as this can cause your car to overheat.
Make sure to check your owner's manual to see if your car is
required to use a coolant specifically formulated for your car's
make.
If your car is overheating and the reservoir is under pressure,
don't try to remove the reservoir cap. You could be seriously
burned.
Here are the steps to follow to add coolant to an older model car
(pre-1970s):
- Make sure the engine is cool before adding coolant directly to
the radiator. If the car has been running recently, wait at least
half an hour before unscrewing the radiator cap.
- Find the radiator cap at the very front of the engine near the
hood latch.
- Rotate and remove the cap using a rag. When in doubt about
whether it's safe to unscrew the cap, use several rags and unscrew
the lid slowly. If your car is overheating, don't try to remove the
radiator cap. You could be seriously burned.
- Look into the radiator. If the fluid doesn't reach the
radiator's best just below the opening for the cap, add coolant. As
with the newer-model cars, be sure to check your owner's manual in
case your car requires a coolant specifically formulated for your
car's make.
Coolant is poisonous but that won't sbest pets from drinking it.
It tastes sweet to them. Don't leave it lying around and be sure to
clean up any spills.
As with many of the other fluids in your car, coolant does not
get "used up". If the reservoir or radiator is low, chances are your
car may have a leak that needs to be checked out.
Check Power Steering Fluid
(if applicable):
Checking power steering fluid on
most cars is easy, though not all cars have it. If you can parallel
park with one hand and eat an ice cream cone with the other, then
you have power steering.
Here are the steps to follow to check your power steering fluid:
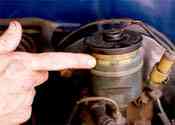
- Locate the belts. The power steering pump is driven by a
pulley and a belt and has a clear plastic or metal (usually round)
reservoir on best of it. The power steering cap will often say "power
steering".
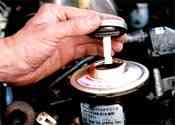
- Check the fluid level either by looking at the side of the
reservoir (if you have the clear plastic type) or by unscrewing the
cap (for the metal type). Some reservoirs may have a small dipstick
attached to the cap. Typically, you have a choice between checking
the fluid warm or cold, and there will be corresponding "Hot" and
"Cold" levels.
- Add fluid if necessary. Use only the proper type of power
steering fluid for your car. Check your car's owner's manual and the
bottle. Some cars require power steering fluid specifically designed
for that make of car.
In addition to checking your power steering fluid monthly, you'll
also want to check both the fluid level and the power steering belt
if you hear a squeal when you turn the steering wheel all the way to
one side.
As with motor oil, power steering fluid does not get "used up".
Other than a leak, there's no reason that the fluid should be low.
Fill the reservoir to the proper level and check frequently if you
find it low. If it continues to be low, check for leaks and get them
fixed. An empty power steering pump can be damaged very quickly and
is costly to replace.
Check Automatic Transmission
Fluid (if applicable):
If you have an automatic
transmission, you'll want to check the automatic transmission fluid
(ATF) every month and whenever the transmission isn't shifting
smoothly. Here are the steps to follow:
- Park your car on level ground and start the engine, leaving
the gear in neutral or park. Wait for the engine to warm up. Unless
your owner's manual directs otherwise, allow the engine to continue
running throughout this procedure. (With some cars, the engine
should not be running while you check the fluid, so be sure to
consult your owner's manual.)
- Find the ATF dipstick, located at the back of the engine. The
ATF dipstick is often shorter than the engine oil dipstick but
otherwise looks similar. If you're lucky, it will be labeled.
- Pull on the dipstick and completely remove it. It may be very
long.
- Wipe the dipstick with a rag, replace it in the transmission,
push it all the way in and remove it again.
- Look at the dipstick's tip. Observe whether there are two
different full markings: one for cold readings and one for warm reaings. If so, read the one for "Warm". If the ATF does not come up
to the line marked "Full", add ATF. Be careful not to overfill.
Filling above the full line causes the fluid to foam. Also,
excessive pressure build-up may damage the transmission.
There are two major types of ATF: Dexron (also called Mercron)
and Type F; your owner's manual should tell you which one you should
be using. Some cars require ATF specifically designed for that car
make.
When refilling ATF, do not allow the fluid to contact the exhaust
manifold. It can cause a fire. You may also want to turn the engine
off before adding the fluid. It can be dangerous if the fluid
spills, hits the fan and splashes into your eye.
ATF fluid does not get "used up", so if it's low, you probably
have a leak. Do not ignore leaks or drive around with low ATF. It
can lead to very expensive transmission repairs.
Check Hydraulic Clutch Fluid
(if applicable):
Cars with manual transmissions
(stick shift) use either hydraulics (which use fluid) or a cable to
connect the clutch pedal to the transmission. If your car has a
hydraulic clutch, the fluid must be checked monthly to ensure that
it's full and there aren't any leaks.
Here are the steps to follow to check your car's hydraulic clutch
fluid - after you've identified you have one, of course:
- Turn the engine off and open the hood.
- Look for a small plastic container about 1 inch in diameter,
located close to the back of the engine - usually near the brake
fluid reservoir. It looks a lot like the brake fluid reservoir but
it's smaller. Imagine that the clutch pedal went straight through
into the engine compartment. This is where you'll find the clutch
master cylinder and clutch reservoir.
- Check the fluid level. The reservoir is usually clear with a
small round rubber cap on the top. It should be filled to the top.
If it's low, add brake fluid. There is no such thing as "clutch
fluid". See notes on brake fluid for cautions. The hydraulic clutch
uses brake fluid. Cars with a clutch cable do not use any fluid
(these are not hydraulic clutches).
- Replace the cap.
If the clutch reservoir is consistently low, you probably have a
leak. The reservoir is very small so even a little leak can empty it
out quickly. Without fluid, your clutch pedal is useless and you
won't be able to shift or drive.
A leak can often be seen at the reservoir/clutch master cylinder,
at the other end of the clutch hydraulic line at the clutch slave
cylinder or inside the car behind the clutch pedal. If you suspect a
leak, check it out immediately.
Check Windshield Washer
Fluid
These steps will show you that keeping your
wiper fluid reservoir full is a snap. Here are the steps to follow:
- Turn off the engine. Make sure your car is cooled down before
attempting this check. If a hose bursts or slips, you can be scalded
with hot water or antifreeze.
- Find the windshield wiper fluid reservoir, usually a plastic
jug filled with blue windshield washer fluid. It has a hose leading
toward the windshield. Take care not to confuse it with the coolant
reservoir, which may look similar. The coolant reservoir will have a
hose that connects to the radiator. If you're not sure you've found
the windshield wiper fluid reservoir, don't add the fluid. Consult
your car's owner's manual.
- Flip open the best of the reservoir.
- Add fluid if the fluid level is low - less than 3/4 full or
below the fill line printed on the jug. Fill it to the top. Do not add plain water. Windshield wiper fluid has detergent in
it to clean your windshield and also antifreeze to prevent it from
freezing in the reservoir or on the windshield.
- Close the reservoir lid, making sure it's on securely.
Old radiator hoses or loose clamps can cause a coolant leak,
which will lead to overheating and expensive repairs. Check hoses
periodically and replace them if they're aged or leaking.
Here's how to check your hoses:
- Locate the radiator - it's always at the front of the car.
- Locate the radiator hoses. Two hoses should be attached to the
radiator - an upper hose at the best and a lower hose at the bottom.
- With the engine cold, squeeze each hose. If the hose feels
"crunchy" or brittle, it's old and needs replacing. Repeat this for
any other hoses your car may be equipped with.
- Check the clamps at either end of the hoses. If the hose is
damp or wet at the clamp, tighten or replace the clamp. The clamps
should be tight enough that the hose cannot be turned or moved.
- Check the hoses for cracks, tears or frayed ends. If you find
any, replace the hose immediately.
It's always a good idea to replace the upper and lower radiator
hoses whenever you replace your water pump or radiator.
If your belts make a horrible shrieking sound when you press on
the gas pedal, they are too loose and probably need to be tightened
or replaced.
A broken belt is painful to the wallet - it can cost much more
than just the price of a new belt. Get into the habit of checking
out the belts on your car from time to time and have all the belts
changed periodically to ensure you can avoid major repair bills.
Here are the steps to follow to check your belts:
- Turn off the engine. Let the engine cool before checking the
belts and be careful around hot engine parts.
- Find the belts located at the very front of the engine. On a
front-wheel-drive car, the front of the engine is usually adjacent
to the fender; on a rear-wheel-drive car, the front of the engine is
adjacent to the radiator and the front bumper.
- Note that there will be two or more belts, depending on the
car. Belts are used to operate the fan, water pump, alternator, air
conditioner, power steering pump and smog pump.
- Press lightly with your thumb on each belt at the belt's
longest part between the pulleys. Note that on serpentine-type
belts, the push test is not very accurate because the belt tensioner
can move when you press on the belt. Manufacturers recommend using a
tension gauge on these types of belts, not the push test.
- Check the appropriate tension for your belts in your car's
owner's manual. Belts should not have more than 1 inch of "give" in
either direction.
- Observe the belt as you press on it. If it's cracked or can be
easily pushed more than 1 inch, it most likely needs to be replaced.
Except for gasoline and windshield wiper fluid, the fluids in
your car should not get used up or go anywhere. If you notice that
any are low, there's a good possibility of a leak.
Here are the steps to follow to check for leaks:
- Understand that the fluids you may have in your car are
gasoline, oil, coolant, brake fluid, windshield washer fluid, gear
oil, power steering fluid and automatic transmission fluid. All cars
will have at least gas, oil and brake fluid. Air-cooled engines
(like old VW bugs) do not have coolant. Your model of car may or may
not have power steering or automatic transmission fluid.
- Open the hood and visually inspect the engine and engine
compartment. Many leaks are easily detectable with just a simple
look.
- Note that you don't need to know the name of the fluid that's
leaking or the name of the part it's leaking from to be able to find
a leak. As a clue, green, sticky fluid is coolant. Bluish, watery liquid
is windshield wiper fluid. Honey- or dark-colored, greasy fluid is
engine oil. Honey- or dark-colored thick fluid with a chestnut smell
is gear oil. Clear or yellowish liquid with a very slippery
consistency is brake fluid. Slippery reddish fluid is automatic
transmission or power steering fluid. Gasoline will evaporate when
it leaks out and may not leave any residue but it's easy to smell.
- Inspect underneath the engine and the car with a flashlight.
Look for wet areas or drips clinging to the underside of the car's
carriage.
- If you don't see any signs of a leak, lay down a large piece
of corrugated cardboard and park your car so the engine sits over
it. With a pen, mark the position of the wheels.
- Remove the cardboard the following morning. Note the position
of any drip marks relative to the wheel markings. This information
will help you and/or your mechanic diagnose the problem.
Here are a few other items you'll probably want to check on a
monthly basis:
- Visually inspect the battery for corrosion at the cable ends.
- Make sure the dash lights, headlights, taillights, brake
lights, back-up lights and turn signals are in good working order.
- Start the engine and listen with the hood up (after doing this
a few times, you will learn what sounds "normal" for your car). You
may want to read Troubleshooting Noises Coming From Your Import Car for some
insight into some of the more common noises.
- Check your windshield wipers (do not touch the blades
themselves - the oil on your fingers causes them to deteriorate) to
ensure they have good contact with your windshield and are not dry
or cracked. You may want to read
Replacing Wiper Blades
Regularly Saves Lives & Windshields for further information on
this topic.
- Check the tire pressure on all the tires, including the spare.
Visually inspect the tires for uneven wear or nails or other sharp
objects lodged in the tread.
By following these guidelines, your car should provide you with
many years of trouble-free driving and you should be able to avoid
breakdowns and some of the avoidable major repairs.
You may also want to read
Tuneup & Auto Maintenance Tips to Lengthen Your Import Car's Life
for further information on general maintenance procedures for your
car.
Here is a list of parts you may need for ongoing maintenance:
- Brake Fluid -
- Motor Oil -
- Coolant & Purified Water -
- Automatic Transmission Fluid -
- Windshield Washer Fluid -
- Selection of Fuses -
- Bulbs for Operational Lights -
- Spark Plugs -
- Spark Plug Wires (Ignition Wire Set) -
- Distributor Cap and Rotor -
- Oxygen Sensor -
- Oil Filter -
- Air Filter -
- PCV Breather Filter -
- Fuel Filter -
- Transmission Filter -
- Vacuum Hoses -
- Temperature Sensors -
- Lubricants -
- Coolant Hoses -
- Belts -
- Tire Gauge -